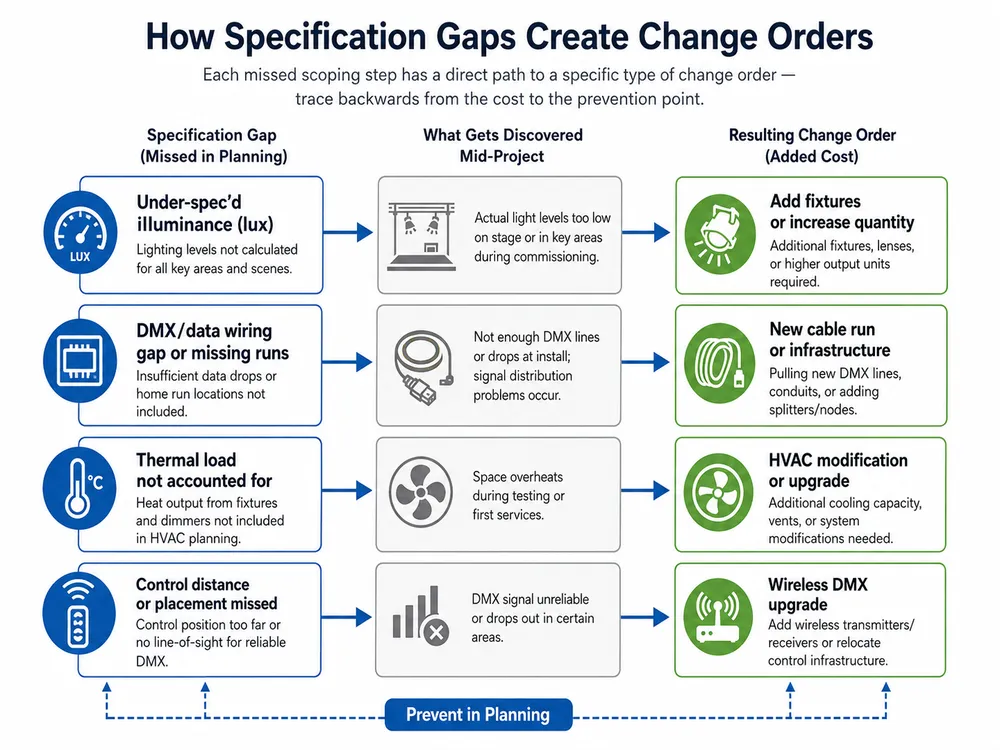
What bad church lighting actually costs you
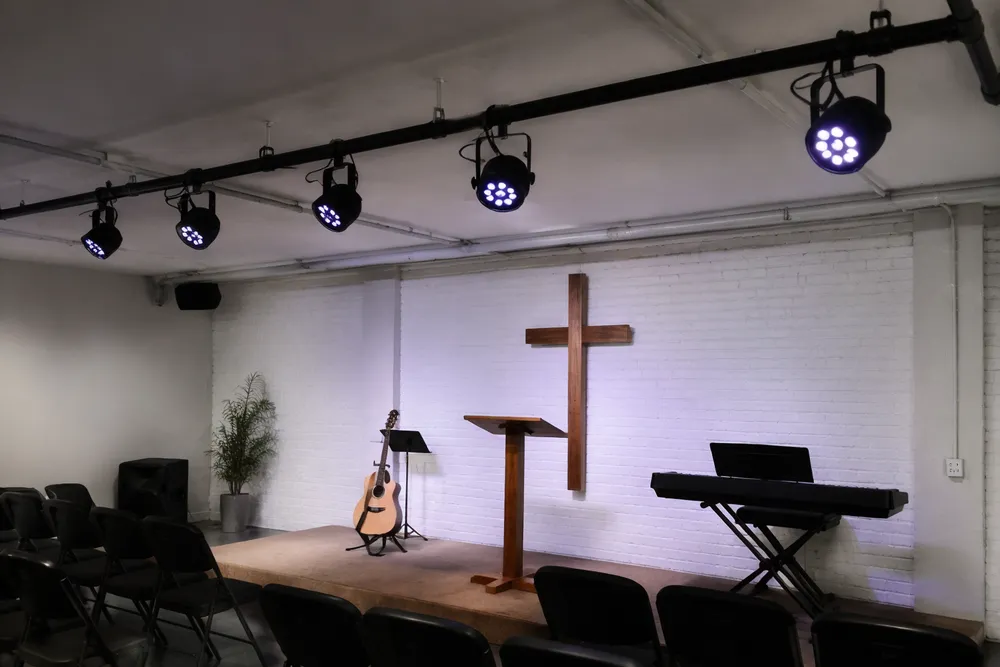
The most common church stage lighting setup problem we see isn't darkness — it's glare. Front wash fixtures aimed too low blast the first three to five rows directly in the eyes. Congregants shift seats, complain to the facilities committee, or just stop sitting up front. The stage looks fine from behind the sound booth. Nobody notices the problem from where the tech team stands.
The second failure is invisible until you check the livestream. Without proper back light, your pastor appears flat against the background — a talking head pasted onto a wall. Media teams troubleshoot cameras, adjust white balance, and buy new lenses. The actual problem is a $200 fixture that was never installed behind the stage.
Then there's the budget drain. We've visited churches that spent $15,000–$20,000 on moving heads because someone saw them at a conference. Those fixtures now sit in static mode 95% of the time. The volunteer running the board on Sunday morning doesn't know how to program cues, and nobody on staff has time to learn. That money could have covered a complete LED par system with proper placement, a spare parts inventory, and a year of utility savings.
These mistakes compound. Glare complaints lead to awkward workarounds (tilting fixtures upward until they hit the ceiling instead). Bad video leads to expensive camera upgrades that don't fix the root cause. Overcomplicated systems lead to volunteer turnover. This guide covers how to prevent all of it with fixture placement physics, selection logic tied to room dimensions, and a DMX approach your rotating volunteer team can actually operate.
Front wash, back light, and side fill — beam angles and placement that prevent glare
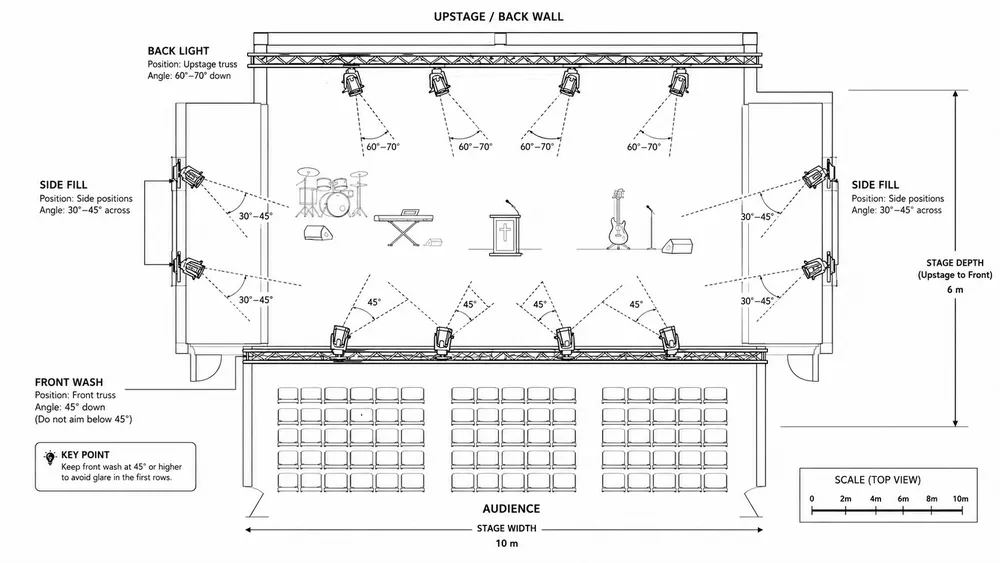
The single rule that eliminates congregation glare: mount your front wash fixtures at a minimum 45° vertical angle relative to the stage floor. When light strikes downward at 45° or steeper, the beam terminates on the stage surface and the people standing on it — not on the seats beyond. Anything shallower than 40° sends light directly into audience sight lines.
Mounting height calculation: Take your stage depth (front edge to back wall) and multiply by 1.5. That's your minimum mounting height above stage floor level. A stage 4 meters deep needs front wash fixtures at least 6 meters above the stage. This ensures the 45° angle geometry works even for fixtures positioned directly above the front edge.
(We've seen churches try to cheat this by hanging fixtures lower and pointing them more steeply downward. It creates harsh shadows under eyebrows and chins — terrible on camera. The height matters.)
Beam angle selection by throw distance:
- 15° beam — throw distances over 12 meters (large auditoriums with high ceilings)
- 25° beam — throw distances of 6–12 meters (most mid-size sanctuaries)
- 36° or wider — throw distances under 6 meters (low-ceiling rooms, fellowship halls)
Choosing the wrong beam angle is the second most common church stage lighting design failure. A 15° spot on a 5-meter throw creates a small bright circle surrounded by darkness. A 60° flood on a 15-meter throw wastes 70% of its output on walls and ceiling. Match the optic to the distance.
Back light positioning: Mount behind and above the stage at 60–70° vertical angle. The job of back light is to create a visible edge of brightness along the speaker's shoulders and head — this separates them from the background on camera. Intensity should run roughly half of your front wash level for worship moments (2:1 front-to-back ratio), rising to equal intensity during high-energy segments.
Side fill: Position at 30–45° horizontal from the stage centerline. Side fill adds dimension to faces — without it, your livestream produces flat, shadowless video that looks like a passport photo. Two to four fixtures, one from each side, running at about 50–60% of front wash intensity.

Front wash coverage math: For even illumination across a 10-meter-wide stage, you typically need 4–6 fixtures with overlapping coverage zones. Each 25° beam at an 8-meter throw covers roughly a 3.5-meter diameter circle on stage. Overlap adjacent fixtures by 30% to eliminate dark gaps between pools. This is the math that most worship stage lighting guides skip — and the reason many churches end up with bright spots and dead zones instead of even coverage.
Fixture selection by sanctuary size and ceiling height
The right fixture type depends on three things: your ceiling height, your stage width, and whether you broadcast video. Everything else — color mixing modes, gobo capability, movement features — is secondary to getting these basics matched.
| Factor | LED par can | Ellipsoidal (profile spot) | Moving head |
|---|---|---|---|
| Best ceiling height | Under 7 m | 4–12 m | Over 7 m |
| Stage width coverage | Wide flood, overlapping | Sharp-edged beams, precise | Variable, motorized |
| DMX complexity | 4–8 channels | 4–6 channels | 16–24 channels |
| Volunteer operability | Simple | Moderate | Complex |
| 5-year maintenance | Near zero | Near zero | Motor/belt service |
| Typical unit cost (FOB) | $80–$200 | $150–$400 | $300–$1,200+ |
| Livestream quality | Good with CRI 90+ | Excellent edge control | Excellent (if used correctly) |
LED par cans handle 80% of church stage lighting needs. Fixed front wash in rooms with ceilings under 7 meters, wide beam coverage, simple 4–8 channel DMX operation, and essentially zero maintenance beyond cleaning the lens every few months. For churches on a budget that still need broadcast-quality results, a set of high-CRI LED stage lights for church applications delivers the best cost-per-lux value.
Ellipsoidals (also called profile spots or ERS fixtures) earn their place when you need hard-edged beams — for example, to light the pulpit area without spilling onto a projection screen 2 meters behind it. They cost 2–3× more per unit than a par can but solve a specific problem that pars physically cannot. Don't buy them for general wash — that's overspending for a job a par does better and cheaper.
Moving heads are the most common overbuys in church lighting. Unless your facility doubles as a concert venue or conference center with a dedicated production staff, moving heads collect dust. They require complex programming, regular maintenance on pan/tilt motors and belts, and 16–24 DMX channels per fixture. A volunteer running presets on Sunday doesn't need motorized pan/tilt. (We manufacture both — and we tell church buyers this honestly. Moving heads make sense for multi-use auditoriums that host events and concerts outside of worship services. For Sunday-only sanctuaries, the money goes further on pars and ellipsoidals.)
CRI matters more than you think. LED stage lights for church worship need a Color Rendering Index of 90 or higher. Fixtures with CRI below 80 produce light that looks acceptable to the naked eye in the room — but on camera, skin tones go greenish or grey. Your media team will fight this endlessly with camera settings and never fully fix it because the problem is the light source, not the lens.
Fan noise is a spec, not an afterthought. Any fixture mounted within 6 meters of a live microphone needs a fanless or silent-fan design (≤30 dB at 1 meter). This is a purchase-time decision. You cannot silence a fixture designed for forced-air cooling after installation. We run convection-cooled thermal designs on several PAR models specifically for worship installations where a quiet moment shouldn't compete with fan whine.

DMX channel plan that volunteers can run without training
The goal for a volunteer-operated church stage lighting setup is one-button scene recall. Your Sunday morning operator should walk up to the board, press "Sermon," and the stage looks correct. No fader adjustments, no channel hunting, no guessing.
Group fixtures by position, not by type. Assign all front wash fixtures to one control group. All back lights to a second group. All side fills to a third. This means the volunteer thinks in terms of "brighter stage" or "more back light" — not "fixture #7 needs channel 4 at 180."
Starter patch list for a 12-fixture setup:
| DMX Channel | Assignment | Fixtures |
|---|---|---|
| 1–2 | Front wash (left 3 pars) | Master dimmer + color temp |
| 3–4 | Front wash (right 3 pars) | Master dimmer + color temp |
| 5–6 | Back light (2–3 fixtures) | Master dimmer + color |
| 7 | Side fill left | Master dimmer |
| 8 | Side fill right | Master dimmer |
Program 4–6 preset scenes:
- Sermon — front wash at 80%, back light at 40%, sides at 50%. Neutral white (3200–4000K).
- Worship — front wash at 60%, back light at 70%, sides at 40%. Warmer tone, optional color accent.
- Prayer/dim — front wash at 30%, back light at 20%, sides off. Warm amber.
- Video roll — all stage lights at 10% or off. House lights remain.
- Transition — front wash at 50%, back at 50%. Quick crossfade between segments.
- Special — full intensity all positions, configured for baptisms, presentations, or guest speakers.
Physical labeling is mandatory. Write "SERMON," "WORSHIP," "PRAYER" directly on the board with label tape or a printed overlay. Volunteers rotate every few weeks — nobody memorizes button numbers.
The 15-minute test: if you can't explain the entire board operation to a new volunteer in 15 minutes, the system is too complex. Either simplify the patch, reduce the scene count, or upgrade to a controller with touchscreen preset recall. A small church stage lighting setup guide should never require a 40-page manual.
Budget tiers — fixture counts, expected results, and 5-year cost
Tier 1 — Starter: $1,500–$3,000
- Fixtures: 6–8 LED pars (200W, CRI 90+, 25° beam)
- Controller: Basic 192-channel DMX board with 8 scene presets
- Coverage: Front wash only, even stage illumination
- Result: No glare, adequate single-camera livestream, clean stage presentation
- Room size: 50–150 seats, ceiling 3–5 meters
Good enough for a community church that wants to look professional on video without any complexity. No back light at this tier — the trade-off is slightly flat video, acceptable when camera quality and room acoustics are your bigger constraints.
Tier 2 — Standard: $4,000–$8,000
- Fixtures: 10–14 LED pars + 2–4 ellipsoidals
- Controller: Scene-capable board with 12+ presets and crossfade
- Coverage: Front wash + back light + basic side fill
- Result: Broadcast-quality video separation, color accent capability, multi-scene worship
- Room size: 150–500 seats, ceiling 4–7 meters
This is where most churches should land. The back light alone transforms video quality. Ellipsoidals handle pulpit isolation or gobo texturing on the back wall. LED stage lights for church in this configuration give you 90% of a production-level result at 40% of the cost.
Tier 3 — Production: $10,000–$20,000
- Fixtures: Moving heads + LED wash + profile spots + pixel bars
- Controller: Multi-zone DMX with show programming
- Coverage: Full multi-zone rig with effects capability
- Result: Concert-level flexibility, event hosting, conference production
- Room size: 500+ seats or multi-use auditoriums
Only justified if your facility hosts concerts, conferences, or events beyond Sunday worship. Requires a dedicated operator or pre-programmed show files.
5-year total cost comparison: An LED par rated at 50,000 hours of LED life needs zero re-lamping over a decade of Sunday services (roughly 2,000 operating hours over 5 years). A traditional halogen par running the same schedule needs new lamps every 1,000–2,000 hours — multiply lamp cost × fixture count × replacement frequency. For a 12-fixture rig, that's often $1,500–$3,000 in lamp replacement costs that LED eliminates entirely.
Power consumption: 12 LED pars at 200W each draw 2.4 kW total. Equivalent halogen coverage needs 12–15 kW. At typical US commercial electricity rates ($0.12–$0.15/kWh), the difference saves $400–$600 annually in a church running services three times per week. LED fixtures typically pay back their premium over halogen within 18–24 months on energy savings alone.
Five common church lighting mistakes and how each one wastes money
- Aiming front wash too low. Light hits the congregation's eyes instead of the stage. Fix: re-aim to maintain 45° vertical angle minimum, raise mounting height if necessary.
- Buying moving heads for a volunteer-run room. Complex fixtures that require programming expertise sit in static white mode permanently. Fix: buy LED pars, put the saved budget into proper positioning and a good controller.
- Ignoring CRI when purchasing fixtures. Cheap LED pars with CRI 70–75 look fine to the eye in the room but produce grey, lifeless skin tones on camera. Fix: specify CRI 90+ at purchase. The price difference is typically 15–25% — far less than the cost of living with bad video or replacing fixtures later.
- No back light. The single cheapest upgrade that produces the biggest on-camera improvement, and the one most churches skip because it isn't visible from the audience's perspective. Fix: add 2–3 fixtures behind and above the stage at 60–70° angle, running at 40–50% of front wash intensity.
- Running all fixtures at 100% in one static scene. Church stage lighting design requires at least 4 distinct scenes because sermon, worship, prayer, and announcements have completely different visual needs. One setting for every moment is the wrong setting for most moments. Fix: program presets, give the volunteer one-button access to each scene.
How to spec fixtures before purchase — preventing returns and regrets
Before placing an order for church lighting fixtures, confirm these specifications in writing from your supplier:
Minimum spec checklist:
- CRI ≥ 90 (verified with integrating sphere test data, not just catalog claims)
- Beam angle matched to your actual throw distance
- Fan noise ≤ 30 dB at 1 meter (or confirmed fanless thermal design)
- DMX channel mode compatible with your controller's universe capacity
- Power draw per fixture × fixture count stays within your circuit breaker capacity
- Color temperature consistency: ±200K unit-to-unit variation maximum
Request photometric data. A reputable manufacturer provides IES files or at minimum a lux-at-distance table. If your supplier can't provide measured photometric output for the fixture you're quoting, that's a red flag — you won't know whether 6 fixtures or 12 fixtures will cover your stage until they arrive.
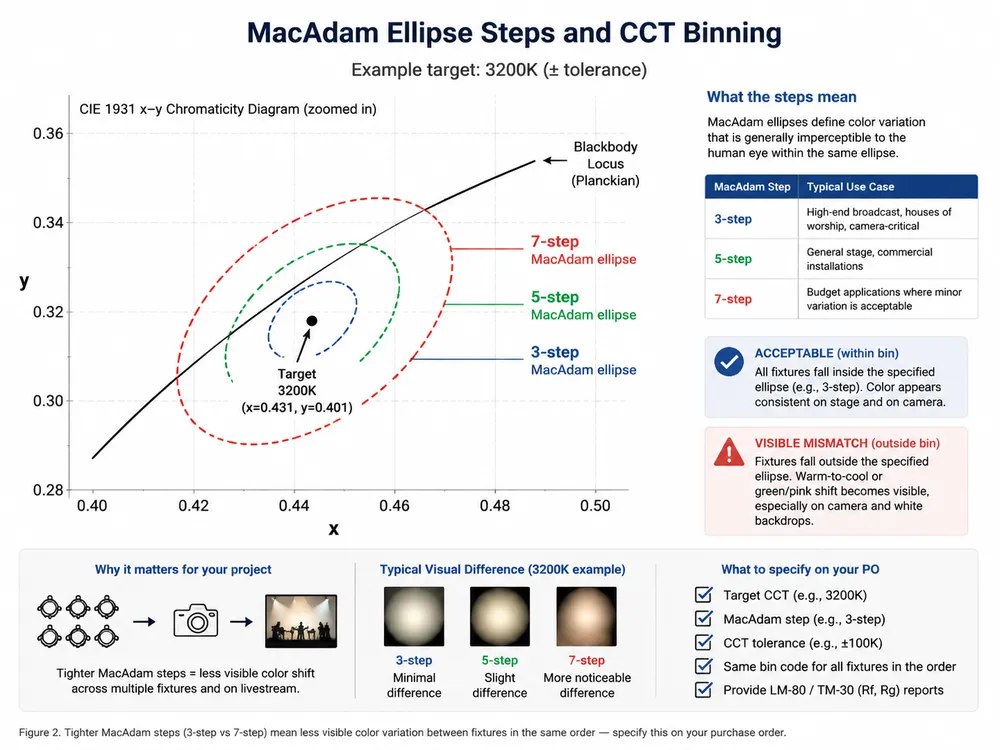
Color temperature consistency matters across a batch. When you order 12 pars, they need to match. We bin LEDs on our SMT line and hold color temperature within ±150K across a production run. A supplier with wider drift (±500K or more) will deliver a batch where some fixtures look warm-white and others look cool-white on the same stage. Visible mismatch. No fix except replacement.
For overseas orders: confirm CE/FCC compliance documentation is ready before the container ships. We've seen churches discover at customs clearance that their supplier's "CE certified" claim was self-declared without a test report. Get the actual EMC test report number and the responsible lab name before you pay the balance. (We provide full compliance documentation with every shipment — test lab name, report number, and copies of the certificates. This should be standard, not a special request.)
If you're speccing a system from scratch and need help matching fixture types to your specific room dimensions, send your sanctuary floor plan with ceiling heights and seating count to request a custom lighting quote — we'll return a fixture package recommendation with a layout diagram and DMX patch plan at no charge.